In this blog post, we will guide you through the process of creating a SQL user in Microsoft SQL Server using the graphical user interface (GUI) provided by SQL Server Management Studio (SSMS). The user will have access to only one stored procedure in a specific database, following the principle of least privilege.
Step 1: Connect to your SQL Server instance
Open SQL Server Management Studio (SSMS) and connect to your SQL Server instance using your administrator account.
Step 2: Create a new SQL user
- In the Object Explorer, expand the “Security” folder.
- Right-click on the “Logins” folder, and select “New Login”.
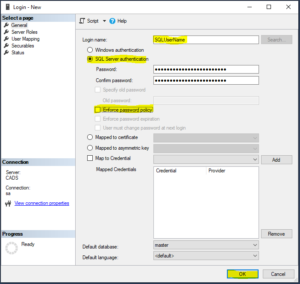
- In the “Login – New” window, enter a desired username for the new user in the “Login name” field.
- Choose “SQL Server authentication” and provide a secure password in the “Password” and “Confirm password” fields.
- Uncheck the “Enforce password policy” checkbox if you don’t want to enforce the default password policy.
- Click “OK” to create the new user.

Step 3: Map the user to the desired database
- In the Object Explorer, expand the “Databases” folder and locate the target database containing the stored procedure.
- Expand the target database, and then expand the “Security” folder.
- Right-click on the “Users” folder, and select “New User”.
- In the “Database User – New” window, select the “User type” as “SQL user with login”.
- In the “Login name” field, select the newly created user.
- In the “Default schema” field, enter “dbo” (or the desired schema).
- Click “OK” to create the new database user.
Step 4: Create a custom database role
- In the target database, expand the “Security” folder.
- Right-click on the “Roles” folder, and select “New” > “Role”.
- In the “Database Role – New” window, provide a suitable name for the new role in the “Role name” field.
- Click “OK” to create the new role.
Step 5: Grant execute permission to the custom role
- In the Object Explorer, locate the stored procedure you want the user to have access to within the target database.
- Right-click on the stored procedure, and select “Properties”.
- In the “Stored Procedure Properties” window, select the “Permissions” page.
- Click “Search” and select the custom role you created earlier.
- In the “Explicit” tab, check the “Grant” checkbox for the “Execute” permission.
- Click “OK” to apply the changes.
Step 6: Add the user to the custom role
- In the target database, expand the “Security” folder, and then expand the “Roles” folder.
- Expand the “Database Roles” folder, and right-click on the custom role you created earlier.
- Select “Properties”, and in the “Database Role Properties” window, select the “Members” page.
- Click “Add” and select the newly created database user.
- Click “OK” to add the user to the custom role.